


Just Add Lightness LED Rear Lighting
- CTRMint

- Mar 8, 2020
- 4 min read
Updated: Jan 2, 2024
Within the Seven community, there is a lot of discussion around the topic of rear lights and safety. It is generally perceived that motorists driving behind a Seven don't react particularly well to the lighting fitted as standard. The main cause for this perception is firstly the location of the lights, i.e. low down on the rear arches out of a drivers main line of sight and secondly, the brightness of the lights supplied. Relocating the rear lights does not seem a practical proposition however numerous kits are available to install an additional brake light onto the roll bar, and hence improve the following driver's response to brake input.
With the introduction of LED lighting solutions, it is also now possible to address the topic of brilliance. LED installations are always notably brighter than filament bulbs, however they have another significant benefit. An LED light array will reach maximum brightness significantly faster than a traditional filament bulb. Such a statement might seem insignificant, however, the improved response time may help compensate for the less than ideal location of the rear lights. It may make all the difference during a hard stop, the difference between being shunted or not.
In a previous blog post in which I installed LED front indicator bulbs, I demonstrated the difference between a filament bulb and an LED. 200fps slow-motion video was used to record the two lighting solutions illuminating at the same time. The difference was quite stark, LED was substantially faster. It’s a no brainer to have such an advantage at the rear, particularly for the brake lights. For this reason, I’ve decided to fit LED rear lights, initially to the 420R as it sees greater road use.
Caterham Cars and many aftermarket specialists now offer LED lighting both front and rear. I’ve opted to fit the Just Add Lightness (JAL) rear LED lights to the 420R. Just Add Lightness supplied the LED front indicator bulbs I fitted previously. The quality of the indicators was first class and the supporting customer service excellent, so I’m happy to use their rear lighting solution. As a bonus, the Just Add Lightness lights are also cheaper than Caterham Cars.
In the remaining section of this blog, I'll briefly document the Just Add Lightness LED rear lighting units. I’ll provide the usual photographs, weight and a brief review regarding quality. I’ll then cover the installation process which isn’t complex, but always handy for anyone else considering the upgrade. In a similar fashion to the indicator install, I’ll provide a side by side comparison, using filament bulbs on one side and the LED on the other.
JAL ship the lighting units wrapped in bubble wrap, which seems perfectly fine for the task. Each unit is essentially identical to the standard filament bulb units supplied by Caterham. They include the standard rubber backing block, standard lens and of course the light itself. 4 plastic washers are also supplied, these are used between the mounting screws and circuit board.


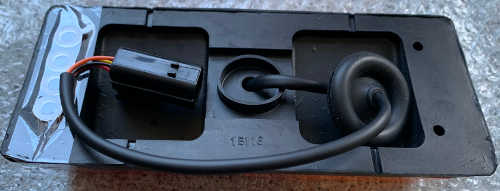

So what's different, well the inclusion of a circuit board which contains the individual LEDs. The board replaces the bulb holders which are normally present. The following images show the basic difference.


For those that might be interested, here's a couple of detailed close-ups of the circuit board.
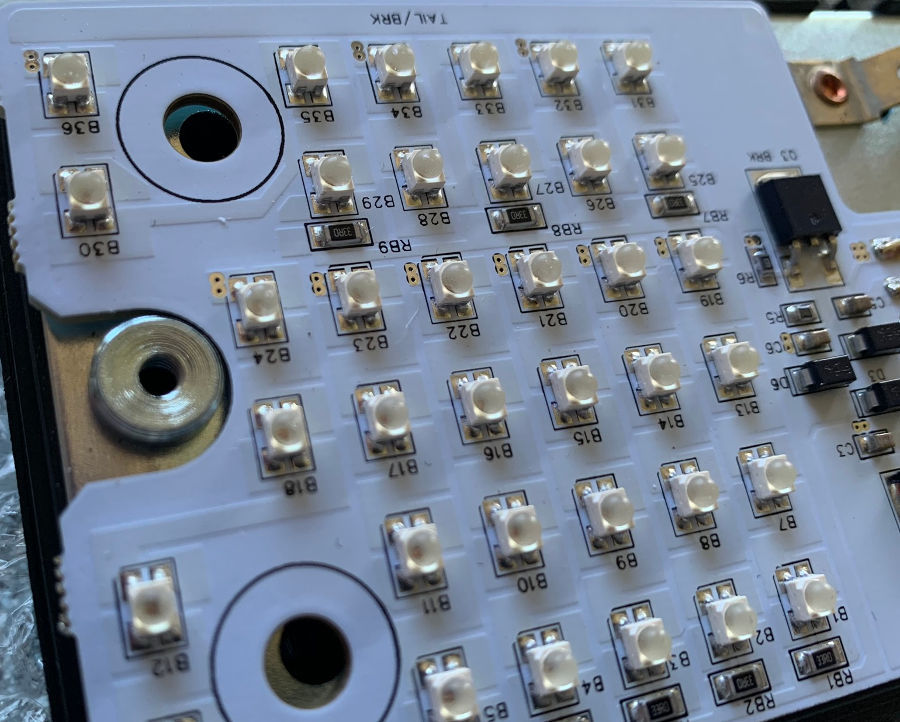

The circuit board looks well made with the sort of quality expected from JAL. The LED units are slightly lighter than the standard filament units, although we are talking a very small difference. Each standard unit is 559 grams, with the lighter LED units weighing in at 547 grams.
Installation is very simple, the job doesn't take more than 15 minutes per light. JAL also provides an excellent instructional video which I recommend referencing. I've linked the video below.
While the video is very comprehensive and pretty much covers everything, there was one key element it missed. You must make sure the circuit board is properly recessed into the rubber surround before attempting to install. Initially, I found my circuit boards weren't seated correctly and needed to be gently pushed into place.
During the installation I took the opportunity to apply ACF50 onto the electrical connector which connects to the car's loom. This included both internal and external areas. I ensured a healthy dose went into the back of each side, helping to prevent the ingress of any moisture. ACF50 was also smeared along the cable all the way to the back of the lighting unit. Each mounting screw was then lightly covered to help prevent corrosion and act as a lubricant, ensuring smooth entry through the rubber block. You may notice in the above photograph of the mounted LED light unit only three mounting screws are shown. The four was pending. I used a different hex screw, nyloc nut and cradle clips as per my blog post, Rear Light Cluster Cabling.
So how did the lights perform after installation? Well, it’s said a picture tells 1000 words, I'll let a photograph do the initial talking then.

The difference between the standard filament bulbs in the lefthand light and the JAL LED on the right is very noticeable. The photo does not show the brake light either. Of course the photo was taken quite close up, but you can imagine how beneficial the increased brightness will be at a distance. I took an additional photograph slightly further away to help demonstrate.

During the process of installation I recorded a couple of videos to better illustrate the units during operation.
The first video inserted below shows the operation of the rear offside light without the lens cover. During the video the brake light is depressed and released, the indicator is then set, followed by the rear light. The video was shot with the garage ceiling lighting on.
The next video details the operation of the rear brake light in daylight and also in real-time.
The same footage is now provided in slow-motion, which clearly illustrates the difference in respond time between filament and LED. Again the LED is on the right and the filament on the left.
I'm very impressed with this simple upgrade. I am of the opinion they are excellent safety upgrades and excellent value.
Reference
Just Add Lightness, Rear Light https://www.justaddlightness.co.uk/product/caterham-led-rear-light-cluster/


thanks for the comments flykiller. The difference in the lights are significant, and so well worth the upgrade.
Great article. I had read about the improvement of LED rears but had been put off as someone had mentioned on forum that in sunlight from a distance they were not as bright. Massive difference on your install. Will be investing, thanks. I already have Dave Gemzoe LED headlight bulbs and they are a huge difference compared with stock.