


Caterham Cars Rear LED Light Kit
- CTRMint
- Dec 10, 2023
- 10 min read
2023 has unfolded as an outstanding period for relishing the excitement of driving a Seven. Despite a few weeks still on the horizon, the declining temperatures and imminent road salting create a growing likelihood that another exhilarating drive may have to wait. Among the memorable highlights of this year are my participation in five track days, three of which were organized in collaboration with the Caterham and Lotus Seven Club, and two independent excursions to Silverstone.
Silverstone was a total eye-opener! I thought it wouldn't be as fun because of the track's size and circuit width. I figured I'd lose the thrill of speed. Boy, was I off the mark! The 620R was a beast, tearing down the Hanger straight, hitting 150mph at times. It was pure adrenaline, just plain awesome fun!
The Lotus and Seven club events were also a blast, taking place at some of the UK's top-notch circuits like Cadwell Park, Anglesey, and Croft. Once again, the 620R showcased its prowess on the track. What made these club events even more awesome was the social side of things, connecting with fellow enthusiasts who share the same passion. Croft, in particular, stood out – enjoying a few beers and a barbecue the night before added an extra layer of fun, leading to great food and conversations before hitting the track.
Conversations at club events naturally revolve around our cars, and let's be honest, every Seven tends to be a bit unique with personal touches. While I always received super positive feedback about my 620R, there was a recurring comment – my rear brake lights were just not bright enough. Throughout the year, the 620R was rocking the standard bulb units, which, under the blazing summer sun, lacked the brilliance needed for drivers behind to clearly see when the brakes were kicking in. This feedback isn't anything new; those factory light units are pretty subpar. It's a common upgrade to address this issue.
In May 2021, Caterham unveiled an enhanced LED light unit and kit aimed at rejuvenating the rear of the Seven, bringing much-needed modernization and functional improvements, particularly in terms of increased illumination. Although I eagerly acquired one of these kits upon its release, I lacked the time for its installation on the 620R. Similarly, my Seven 420R already sports a comparable kit from an aftermarket supplier, Just Add Lightness. The Just Add Lightness rear LED kit is excellent and comes highly recommended. However, it adheres to the original light design, whereas the new Caterham kit boasts a slightly more modern aesthetic.
Around a month ago with the temperatures doing the limbo, I decided to pull my socks up and install the new light kit, but not on the 620R. The plan was to install the Caterham upgrade light kit on my 420R and move the Just Add Lightness kit to my 620R. The reasoning for this decision relates to aspects of the installation. The Caterham kit installation requires the removal of the Seven boot floor, well if you do it correctly it does. Removing the boot floor in the 620R would be a significant amount of unfavourable work as its external suspension reservoirs would need to be removed from their mounts. That's not something I fancied doing. Thus swapping the light kits around was a suitable compromise, and as mentioned the Just Add Lightness kit is fantastic, and more than addresses the feedback stated at the circuits.
I appreciate that was a rather long introduction to a light kit install blog post, from here on in we'll be looking at the installation itself.
Caterham Cars published an installation video when they released the light kit. Overall it is a detailed and informative film that covers the steps needed to complete the installation, however, it takes an approach I personally wouldn't use. That being routing the supplied sub-loom under the fuel tank mount, and subsequently outside the chassis, plus drilling and fixing more P-clips along the rear of the chassis. Even if you follow the approach I've taken as detailed in this blog post, I'd still recommend watching their video.
Let's begin.
I think it goes without saying you'll need to place the rear of the car on axle stands, the higher the better, and remove both rear wheels as you'll need access into both arches.
Start by removing each of the main light units on the rear arches by following the cable through the skin and rubber grommet until you find the 4-pin Econoseal plug, note it might be cable tied to the chassis. Disconnect the plug being careful not to pull or damage the wiring. Then pull the plug and rubber grommet back through the skin. You are now ready to detach the light from the arch. Remove the outer lens via the 2 lens screws followed by the 4 inner screws in each corner securing the light to the arch. You'll likely find a cradle clip within the arch holding the light cable, cut the cable tie to free.
At this point I recommend removing the boot floor, doing so makes many of the coming tasks easier, including removing the fog and reverse lights.
Removal of the boot floor starts under the Seven, by detaching the fuel pump module from underneath the boot floor. You'll find the module on the passenger side tucked between the fuel tank and skin. It looks like a very large electrical connector secured by two bolts on either side. My tool of choice for this task is a hose clip driver. The one I have is the perfect length to easily reach the bolt heads, and with a large handle that is easy to rotate. Once you've removed both bolts the module will be supported by the loom, so you can safely let it hang. You're now safe to work on the boot floor itself.

Start by lifting the carpet from the boot floor. You may find the fuel filler cowling prevents the removal of the carpet. The cowling is typically secured with two 2 screws straight down into the floor. If the washer bottle is attached to the cowling you'll also need to remove that and deal with the electrical connection and fluid hose.

I built my 420R and opted to use velcro to secure the carpet which makes removal simple. Hopefully, yours is built similarly. My side skin carpet is secured with carpet tape, but the adhesion is easily broken by pulling the carpet away. I recommend removing sufficient carpet to ensure the boot floor is not prevented from lifting due to interference from any carpet.
Once you've removed the carpets work your way around the aluminium boot floor and remove all the fixings, note the 2 under the rubber grommets at the rear edge. Assuming you've removed all fixings, it's now time to wiggle and lift the boot out. This can be tricky, but with a little patience, you'll lift the floor. Once you've lifted it carefully stand the floor on its side and position away from you towards the passenger compartment. Having lifted the floor, you'll be able to see down between the fuel tank and rear side skin. This is going to help!
At this point, you can start removing the fog and reversing light. Both are quick and easy. Again remove the lens cover by removing the 2 outer screws followed by the 2 inner countersunk mounting screws. Make sure you don't lose the inner countersunk screws, they are needed when adding the new blanking plates. Trace the cable through the skin, you'll find a 2-pin plug for each, again likely cable tied to the chassis. Carefully disconnect and pull the cable through, and lift the lights away from the car.


With everything removed, it's now time to start adding the new lights. I'd give the body and surfaces a good wipe down with a suitable detailing product at this point also. There's nothing worse than grim getting trapped during a new install. Make sure you clean the fuel tank surface.
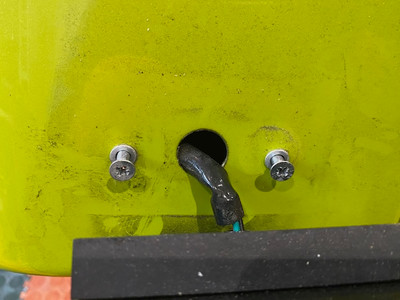
The new lights don't use a 4-pin Econoseal plug, they've a new round connector which will not pass through the existing hole in the wings. You need to make the hole larger using a cone cutter. Caterham claims you can enlarge the hole with a file but I wouldn't fancy trying, and so I strongly recommend sourcing a cone cutter. With a cone cutter you simply drill through the hole until it is large enough for the round connector to pass through, it takes seconds.

Next comes the step you need to get correct, drilling the new mounting holes. The original lights used 4 mounting holes, the new lights have only 2 and they're essentially in the middle of each of the holes from the original light. I would strongly recommend you refer to the Caterham video at this point. The general gist is to drill x2 8mm hole in the middle of the existing mounts (top to bottom). The existing mounts are 42mm apart so you are looking to drill at 21mm. I ended up chasing some perfection here and so used a laser level across the back of the Seven. Doing so helped align each pair of holes per light and ensure both lights were aligned. If you are wondering, I temporarily raised the Seven under the middle of the DeDion bar, doing this helped ensure the Seven was level. When marking and drilling use masking tape as per the Caterham video.

Before installing the new light units you need to replace the cradle clip you likely removed when removing the old lights. I used a 4mm countersunk screw and nyloc nut with the cradle clip through the top innermost hole.
Mounting the lights was a faff, and I'm not sure why, increasing the mounting holes certainly helped, in the end I increased them to 9.5mm, you might be better off starting with that. On the outside of the arch, you will need the light unit, bracket, and gasket in that order, passing the cable through each. Note the orientation of the light and gasket. The light requires the enclosed or complete edge of the C to the outside, and the gasket requires the larger section to the top. I also recommend cleaning and protecting the gasket before fitting. I use Honda's Shin-Etsu Grease for this sort of thing, it's brilliant! Offer up the set to the arch, and pass the cable through the hole, you'll need to support the set. If you watch the video, Caterham states you need the sleeved nut, and tapered washer to complete the installation. For me this approach wouldn't work, the bottom of the light unit would kick out from the bracket. I must have tried for a few hours before deciding to add a washer and split washer to the hardware within the wing. Slide a split washer on the sleeved nut, then a washer, then the tapered washer and tightened onto the threads from the light poking through the wing. It's certainly tricky. Before tightening down, place a spirt level on the lights to ensure you get them spot on.
Next up is the number plate light. My 420R already had a factory LED number plate light however it did not have any connectors to disconnect, it's unclear why, the light was directly wired to the loom. Having removed the mounting plate screws which are located underneath the bracket I opted to cut the wiring at about 6mm from the light. This would give me sufficient cable on the light to reattach if I ever needed it. The lack of a connector isn't an issue as the existing wiring isn't used in the revised setup. Having cut the connection I thoroughly heat-shrinked the end of the wire to ensure it was waterproofed then cable-tied wire to the cabling already present underneath.
The kit includes a replacement number plate light bracket and the corresponding number plate light. Start by attaching the bracket to the chassis, and then mount the light onto the bracket. Utilize the existing screws from the original bracket for the mounting of the new bracket, but you may fnd that the holes in the bracket are too small. It is necessary to drill them out to approximately 8mm.
Once you have enlarged the bracket holes, affix the bracket to the chassis using the existing center hole. Be aware that the two outer holes may not align with the bracket, a point emphasized by Caterham in their instructional video. I opted to drill only one additional hole, as it seems unnecessary to have three holes on such a small bracket supporting such a lightweight component. With the bracket mounted attach the light to the bracket using the new hardware supplied with the light and bracket. I opted to replace the washer for a nyloc washer.
Have you already cleaned your fuel tank? If not, it's essential to do so now. The subsequent step involves laying the new sub loom around the rear of the fuel tank, beneath the area where the boot is positioned.
Before you begin, note the sub loom fits one way round, the green wire going to the 2-pin plug is for the reverse light, it should be aligned with the old reverse light plug.
Securely position the wiring loom beneath the boot floor supports and fasten it to the chassis framework located around the midpoint of the body. Utilize cable ties to ensure a firm attachment. Guide the loom along the upper edge of the fuel area and affix it using adhesive cable tie bases. Unfortunately, I neglected to capture images of my setup—my sincere apologies.

Ensure the central plug aligns with the number plate light during the securing process. When fastening, make certain that the cable ties are snug, eliminating any slack while being careful not to damage the wiring loom. Additionally, confirm that there is no contact between the wiring and the bodywork. Take your time to meticulously carry out this procedure, aiming for a neat and secure arrangement of the wiring loom.
Pass the circular plugs through the bodywork and fasten each securely using the provided lock rings from the kit. Connect the sub loom's 2-pin and 4-pin connectors to the corresponding original 2-pin and 4-pin connectors, ensuring a secure attachment and mimicking the original arrangement of the wiring. Securely cable tie the wiring to the chassis mounts between the fuel tank and outer skin.
Connect each of the round connectors to their repective light, and connector the reverse light.
Now, I highly recommend thoroughly inspecting all the lights at this juncture. Assuming everything is in order, proceed to reinstall the boot floor, carpets, fuel hose cowling, washer bottle, and, of course, the fuel pump module.
To complete the assembly, affix the blanking plates to conceal the openings left by the original fog and reverse lights. Utilize the countersunk screws from the original lights for this purpose. In my kit, I was provided with a selection of reflective or black stickers for the blanking plates, and I chose to use the reflective stickers.
You should be all set now. I trust this blog post proves valuable on your upgrade journey. While these lights come with a substantial price tag, I firmly believe they represent a significant leap forward in terms of aesthetic design and functionality, providing a much-needed enhancement in illumination and safety.

