Unofficial P.B.C. alignment (day-2)
- CTRMint

- Mar 18, 2019
- 3 min read
Saturday 16th March 2019, day 2 of the unofficial PBC at SPC. I went down to SPC for 9:30am, the weather was awful, windy and wet. Paul offered me a strong filter coffee and we got cracking.
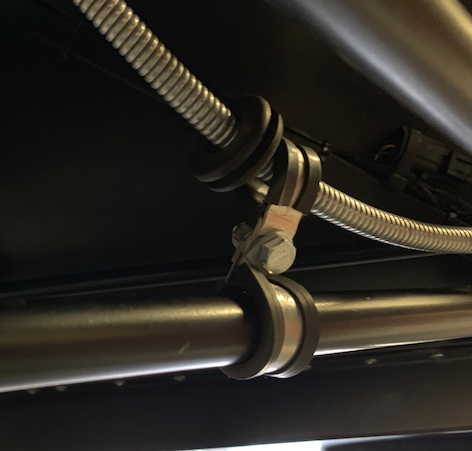
P-clips for the handbrake cable.
I addressed this while Paul attended to some personal matters. Even as an amateur I had the job done in no time thanks to the 7 being supported on a 4 poster ramp. The cable ties I'd used as per Caterham's instructions were cut off with a pair of snips and a combination of opposing P-clips were then wrapped around the chassis and handbrake cable, secured in the middle with an M6 bolt and nyloc nut.
Heat shrinking the steering arms.
Paul recommended we heat shrink the steering arm threaded sections as they have little anti-corrosive protection and are notorious for rusting. To complete this we slackened off the nyloc nut underneath the steering ball joint/rod ends all the way to the end of the thread, then used a rubber mallet to persuade the taper to release. Each ball joint, locking nut and rubber IVA cover was then removed. The cable tie on the end of the steering rack rubber gaiter was also cut. A section of heat shrink was then inserted over the rack ends, just beyond where the rubber gaiter finished, the idea being the gaiter and heat shrink would overlap. Heat was then applied as expected to reduce the heat shrink down. The locking nut and and rod ends were added back, we initially forgot to add the IVA boots, so needed to take the rod ends off again to add the boots back. The gaiter was also secured with another cable tie. Once complete the added protection looked fantastic, and complemented the black pack.

Steering rack adjustment.
When building the car I'd attempted to keep the universal joint in the steering column as straight as possible as I understand it improves the linearity of the steering. Unfortunately Paul felt it was a little close to the the exhaust and so needed to be lowered slightly. This required the rack to be rotated anti-clockwise by a few millimetres. On paper this should have been a quick job, but took much longer than expected as I initially avoided removing the steering rack clamps. I spent far too long trying to rotate the rack with the clamps in place but the retaining bolts fully slackened. In the end I had to remove the top side of the clamps to be able to rotate the rack down. Once I'd committed to removing the top of the clamp it was a quick job. Lesson learnt, just commit and go for it. Unfortunately I didn't take any pictures of the clamp removal or rack position. I may get some at a later date.
On the scales.
We were now ready to setup the car, including corner weighting, ride height, camber and toe. Paul's expertise and knowledge came into play here, and so I can't really comment in detail on how he worked out which component needed adjusting and when. I can comment that I was in and out of the car like a yoyo. I'd sit in the car, Paul would measure and then decide which corner needed adjustment, I'd jump out and remove a wheel, he'd then adjust the strut, I'd put the wheel back, and then jump back in the car. I was exhausted by the end, it was like F1 pit stop training.

The car weighed in at 561kg, with the following specification;
S3 chassis
Duratec 2.0l dry sump + oil cooler
7 Litres of oil
Coolant, I think about 6l
Fuel ~15l
Full carpets
Floor matts
Boot cover
Hood sticks
Carbon seats with padding
4 point harness
Heater
Removable Momo wheel
13" wheels 8" rears
Avon ZZS tyres
Full paint
Bonnet and nose cone missing

We used the tried and tested method of string for the alignment and a camber gauge/board similar to the following image to adjust the camber.


We did find the camber on either side of the car differed, and so we needed to adjust at least one side, in the end we had to do both as the target was in the middle -2 degrees. Adjusting the camber on the car is a bit of a pig as the nut holding the top wishbone ball joint on is a nightmare to access. We got there in the end though.
Last of all the headlights were levelled and secured. Job done.
She's ready for the test!


Comments