


Test fitting the weather gear, full hood
- CTRMint
- Mar 8, 2019
- 3 min read
The reality of living in the British Isles means that rain is a regular reality even through the summer months and so, for this reason, I'd specified Caterham's full weather gear option with my 7. I appreciate many feel this isn't in keeping with the ethos of the car, however, my approach is such that I can always remove the weather protection if desired.
As I'm starting to plan the transportation of my 7 to a local Caterham specialist for an equivalent of Caterham's PBC and the weather is particularly foul at present I started to think about test fitting the weather gear. It's that topic I intend to cover in this post, specifically the full hood. The information provided is based on the starting point as shipped by Caterham, I mention this as I have seen vlogs etc online which required additional work, particularly with the poppers.
In short, my car was sent with all components pre-installed, I only needed to actually fit the hood to the car. You might think then there is little point to the post, well there is one trick to fitting the hood I received from Jim on BlatChat which I think is worth sharing.
As mentioned my car came with all the components pre-installed, but what does that mean. Well Caterham pre-fitted all the poppers around the car, something I'm very thankful for, drilling the bodywork and riveting the popper studs onto the bodywork is not something I would have enjoyed. Caterham also fitted the poppers to the hood itself too, meaning I didn't have to use the DOT tool etc. Lastly Caterham also fitted the hood sticks and straps. Disappointingly though the straps at some point have suffered and the edges have frayed.
Fitting the hood is very simple when you know the tricks.
Firstly move the hood sticks to their forward position and ensure the straps are nice and loose, permitting the forward hood stick to move to the maximum throw.

Now lay the hood over the top of the car, in approximately the correct location.

Next start by securing the poppers around the windscreen, ensuring the felt edge on the hood is stowed behind the windscreen frame. Once complete, move to the rear, attach a couple of the poppers at each corner just near the wheel arch. Next unzip the rear window. I didn't realize the window unzipped, and this was the tip pointed out by Jim on BlatChat. Once unzipped the extra flex in the hood makes life a lot easier. Having unzipped the rear window the remaining rear poppers will fix into place with complete ease.
The next bit is much easier with two people.
The aim is to pull the forwardmost hood stick back towards the rear screen until it can be secured in a sleeve on the roof which is constructed using velcro. As you move the hood stick back, it arcs upwards and applies tension to the roof. Once in place, tighten the straps to prevent it pinging forward again.

I initially approached this through each side door, however, once Jim had recommended unzipping the rear window my revised approach was as follows.
One person should pull the hood stick backwards by placing their hands through the rear window. This approach means you can get a more even load across the stick whilst pulling backwards, and of course, the reduced tension from having the screen down helps. A second person can then access via the door and wrap the sleeve around the stick when in the correct place and tension up the straps. I'm sure with the rear screen down one person can achieve the result through the door, although I've not tested that yet. Of course don't forget to zip the window back up!
The end result.


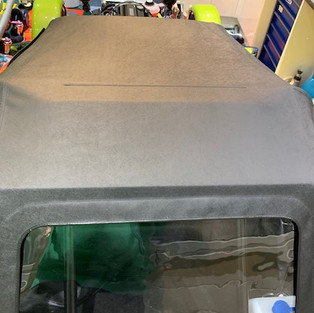


I have to say getting in and out of a 7 with the roof on is interesting, especially with a hot exhaust. At present I don't really know how..... It does start to make you consider whether it was worth purchasing, especially since I also have the tonneau cover. That is to follow, check back to see how I get on fitting the tonneau cover.