


Integra Dc5 Type R rear wheel bearing replacement
- CTRMint
- Dec 31, 2018
- 4 min read
Updated: Jan 21, 2019
As promised in my previous blog article, here is my experience replacing a rear wheel bearing on my Honda Integra Type R DC5 MYR 2005.
A quick summary, the process was pretty straightforward and actually one of the easier tasks I’ve tackled so far, and I expected it to be more complex. In total it took me around 2 hours, it also solved the drone from the rear, so a job well done.
Before we get into the process let’s take a quick look at the part supplied very promptly by Tegiwa.


I’m not an experienced mechanic or hobbyist and so I can’t comment on how common it is to have the bearing pressed into a replacement hub assembly, but it certainly helps! Thanks Honda. You can also just make out the NTN stamp on the bearing too.
Obviously the first step is to jack up the car and suitably support on axle stands, but make sure you release your wheel nuts first. Once the car is supported on a stand remove the wheel. This will reveal the brake disc and calliper.

Now I made a mistake here as I removed the calliper with the hanger in one by removing the larger hanger bolts at the rear of the calliper mount. Doing so allowed me to remove the calliper and hanger in one piece which I then supported with a bungie. The problem is getting the whole unit back over the disc during reassembly, it's impossible. As a result I had to split the calliper and hanger loose which was tricky. My advice is to remove the calliper from the hanger whilst the hanger is still on the car. You can do this using a 12mm socket and 17mm spanner on the smaller calliper bolts. I also removed the handbrake cable and brake line bracket to allow the calliper to be hung with greater ease.
Once you’ve got the calliper and hanger out of the way and supported you need to remove the disc.

You should find the disc is secured to the hub using two small countersunk screws. I’d previously replaced the discs and so the screws had plenty of copper grease on them, as a result they came out with ease. You might find that’s not the case and you need an impact driver to remove them.
Once the screws are out remove the disc, and you can now see the hub and bearing.

The next step is to remove the dust cover protecting the hub nut. The dust cover is a snug fit and isn’t going to pull off. I used a small punch and a rubber mallet to split the cover from the hub. I rotated the hub round and tapped lightly until the dust cover separated. Take care not to damage the cover.

Removal of the dust cover will then reveal the hub nut. You should find the hub nut has been compressed into the cut out on the shaft. I used a smaller punch to pop out the nut from the cut out and then an impact wrench with a 32mm socket to remove the nut.
Once the nut was removed I rotated the hub by hand you and you could feel and hear the faulty bearing, so I was confident I was on the right track replacing this one.
Getting the hub assembly off the shaft isn’t something you can achieve without a bearing puller, and so out came my new pullers. Using the tool is pretty straightforward, fix the hooks around the back of the hub and centre the threaded section on the centre of the shaft. Once setup rotate threaded section and the action will pull the bearing off the shaft.


Unfortunately and as expected the inner race of the failed bearing remained on the shaft, from research this seems to be a common issue and one I’d prepared for.
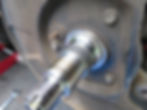
Initially I used a heat gun to warm the remaining race in a hope it would expand and pull off by hand, unfortunately it didn’t work, I suspect because I didn’t have sufficient heat capacity from the gun. I then opted to use a thin punch driven again with a rubber mallet between the back plate and the remaining race. This worked and I gradually gained sufficient movement to then use a smaller bearing puller to finish the task.

Once removed I used plenty of WD40 to clean everything ready of the new assembly.

Before fitting the new hub and bearing I also applied a thin film of grease around the shaft to ensure smooth fitment. The new assembly then just slides on, you should find with moderate force it slides all the way to the back.

Next apply a new hub nut, my kit came with a new one. I torqued to 134ft/lbs and then compressed the nut into the cut out, and finished by marking with an engineers paint pen.

At this point it’s merely a case of reassembly adding the dust cap to the hub nut, brake disc and callipers.
Finally some pictures of the failed part.


I hope you found the blog article interesting and informative. Good luck if you are attempting the same process. I believe the article should also be relevant for the EP3 Civic fitted with rear disc brakes.