


Fitting the gearbox and bell housing
- CTRMint

- Oct 28, 2018
- 3 min read
Updated: Jan 21, 2019
Saturday was all about fitting the gearbox and bell housing.
My good friend and helper came to provide assistance and guidance once more. Although he’d probably state he’d come to suffer my constant fretting over the build.
Any how we started bright and early and began by moving the engine to one side minus it’s starter motor and alternator so that we could unbox the gearbox.

Next we put the engine on the hoist and removed all the bolts from the bell housing. My 420 was shipped with the dry sump guard attached which we also removed by the two black bolts aligned with the other bell housing bolts.


My helper, we really need to give him a nickname, as he doesn’t want to be named on the internet, then suggested we visually check the alignment of the clutch.

To be honest I couldn’t really tell however he was happy everything was good so we moved forward with the process which was to remove the bolts shipped on the gearbox and then offer up the bell housing. This was straightforward and with a rubber mallet the gearbox and bell housing was gently eased together.


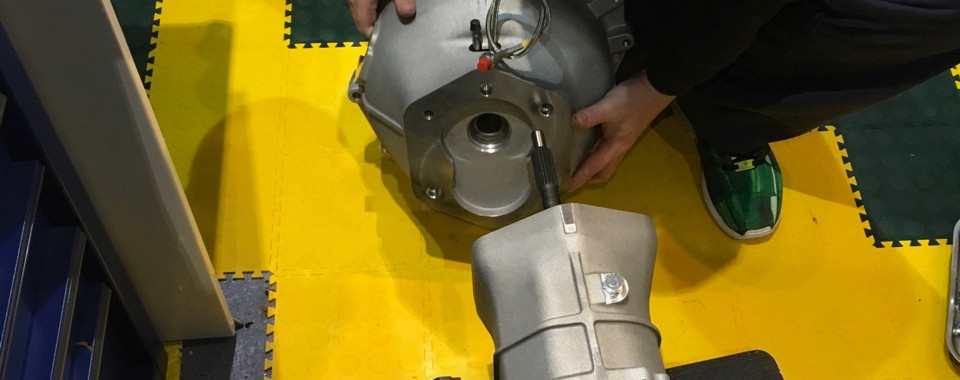


We used the supplied cap head bolts from within the bell housing to fix the bell housing in place and then torqued to specification as per the manual.
Next up, getting the gearbox and bell housing onto the engine. If I’m honest this was more stressful.
Let’s be clear I’m no mechanic, and pretty inexperienced, I’m also a perfectionist, but not always in a good way and I hate rushing into things. This tends to be a recipe for stress and heated conversations if I don’t feel comfortable with something. I feel taking no decision can sometimes be the better strategy.
I’d been warned prior to attempting this section of the build that the gearbox should just slip into place on the engine assuming the splines were aligned. Fellow owners had also warned me about pulling the two surfaces together using the bolts.
We first started the process of joining the two with the gearbox on a set of removal trolleys which allowed it to be moved into place against the engine which was supported by an engine hoist. We got pretty close doing this, but not quite all the way. My mate, let’s just call him Mark, suggested we put some of the bell housing bolts in to at least hold the bell housing from dropping back etc. After some worrying over this, and repeatedly expressing the view we must not pull them together using the bolts I agreed.
Unfortunately we still struggled to make any further progress. We then decided to raise the hoist, engine and gearbox onto my workbench to provide easier access. That didn’t work.
We then started to look at the spline alignment, we had two options rotate the box or the engine. I wasn’t comfortable with rotating the engine, mainly because it had no oil in. I appreciate we were talking a tiny amount, but I just didn’t want to do it. Our second option was therefore to rotate the shaft on the box. We couldn’t easily see how to achieve this, and to be honest Mark had been supporting the box against the engine which was still hung by the hoist. I think his patience at this point was running thin with my indecision and worry. In response Mark put a little more force into the fitment and everything went together. Mark had also been attempting to rotate the fly wheel so I’m not sure if that helped too. Either way the engine and box were now together so we bolted it up and lowered the whole assembly to the floor.
Unfortunately I didn't manage to capture many photos during this part of the build.
Whilst all this was taking place we’d also identified a problem with the hoist, it wasn’t holding properly, and was slowly slipping down. This wasn't good, an unreliable hoist during the engine install which is notoriously difficult and long would be disastrous. The rest of the afternoon was therefore spent sorting a replacement hoist. In the end we opted for a weeks rental from HSS.


Comments