


Dry sump tank install
- CTRMint

- Mar 10, 2019
- 3 min read
This blog post is a retrospective post and briefly covers the installation of the dry sump tank which was performed in two phases, firstly the install of the tank itself, then later the oil lines. There was no particular reason for the install to be performed in two phases. The install was performed with the coolant hoses installed.
My apologies if the post seems a little brief and dull, there's not much to say really, although the hoses are a pain to fit with the new radiator!
The dry sump tank is located between the front cruciform and the engine. It bolts to the cruciform and is also secured underneath using two P-Clips on two chassis tubes.


The height of the tank bracket in reference to the cruciform seems to be out and requires spacing with a couple of washers, there is no mention of this in the assembly guide, but I don't see any other method of installing which would avoid the requirement. Installation is pretty easy.

The tank has three ports at the top and one at the bottom, plus a threaded plug at the bottom. Let's quickly cover the easiest connection first, the breather hose.
The Duratec engine is shipped with a breather hose pre-attached to the rear offside or hot side of the engine. The hose runs above the exhaust manifold and needs cutting to length and securing to the engine with P-Clips. The cut length of hose is then connected to the dry sump tank on the longer curved port also located on the offside, as shown in the photograph below.


This is where it gets fiddly, adding the oil lines for the dry sump tank. At this point you will need an oil cooler in place. Now mine of course is attached to the bottom of the radiator, I've yet to see another car like this, so your build may differ, although Caterham tell me my car is the new 420 design, so builds from 2019 onwards should be applicable.
There are 3 oil lines required, as shown below.

The shape of the Aeroquipe hose connectors certainly help identify which hose goes where! I'll try and explain below.
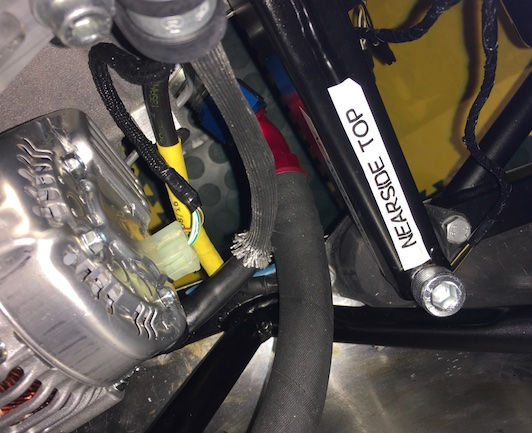
Oil cooler RHD side /offside port ---> Dry Sump tank top port
Oil cooler LHD side/nearside port ---> Engine sump forward port
Dry Sump tank lower port ---> Engine sump rearward port
The hose for the oil cooler LHD side/nearside port is easy to spot as it's the only one with a straight connector. The hose for the oil cooler RHD side/offside port has two 90 degree connectors and part code, CAT3AE212A and is also labelled "Oil return cooler". The remaining hose is for the lower port.
The hose connectors require a 32mm spanner.
Fitting some of the hose connections is an absolute nightmare on the S3 chassis due to the proximity of the chassis. The oil cooler and dry sump tank connections are relatively straightforward although holding the connectors dead straight can be tricky. I found once they were nice and straight you could screw them on by hand, if the connector deflected off centre then the connector would become stiff. For this reason make sure you screw them on by hand and only use the spanner to pinch them up. I also lined the threads with oil to help lubricate the fitment.
The connections which were an absolute nightmare are the two which attached to the bottom of the engine, on the actual sump. The rearward hose needs to be run between the chassis and the bodywork and then connect to the engine, however it runs incredibly close to the bottom of the chassis frame and also the engine mount.

After hours of trying to get the hose on I eventually rotated the engine mount. This allowed me to get the hose on, however getting the engine mount back was equally as tricky. It was one of those jobs which took hours or repeatedly trying the same thing over and over again until eventually I succeeded. To make matters worse the time is spent on your back under the car, so not fun at all.

I recommend you torque everything up and double check it. I made the mistake of not fully torquing the connection on the bottom of the dry sump tank which resulted in a small but annoying oil leak. Getting access to the connection with everything in place was a pain.
The remaining connections on the tank are for the catch can, which I've detailed here;
https://www.caterham7diaries.com/420r/catch-can-install
Plus a blanking plug as mentioned here;
https://www.caterham7diaries.com/420r/clutch-bleeding-wrong-assumption-over-the-nipple
Hope you enjoyed a look back at the dry sump tank install.


Comments