


Coolant System Layout
- CTRMint

- Mar 14, 2019
- 6 min read
Updated: Mar 17, 2019
Even though the build is pretty much complete and I'm basically adding the finishing touches at present there's still plenty of topics from the build I've yet to cover, so please keep checking in.
One of the areas to detail is the cooling system or coolant hoses on the 420R. I think anyone building a kit and particularly the 420R with its added complexities brought by the dry sump is going to be happy plumbing a coolant hose. At the end of the day a coolant hose joins to a port and is clamped with a jubilee clip, so there's nothing particularly difficult in that.
What I feel is worth a quick blog and discussion is the combination of hoses I received and how I ultimately installed them. As with a lot of aspects of the 420R build, the hoses I'd received didn't correlate with the 'Ikea' manual as that details the Sigma based cars which is a totally different engine, and further, the 2015 manual didn't reflect my hoses either. As with such situations I relied on Derek at Caterham to provide additional clarity, however I still decided to tweak the advised install slightly.
If you are looking for a thorough and detailed blog regarding the cooling system on a 420 I would recommend the "PurpleMeanie" blog. Author and builder John Martin goes into fantastic detail regarding the layout and operation of the cooling system, he even provides a 3D model. It's certainly worth your time.
https://www.purplemeanie.co.uk/index.php/2017/10/21/build-session-27-more-bleeding-coolant/
You might then consider why read this blog? My aim is to clarify the hoses, something John and other blogs haven't really attempted. I spent a huge amount of time worrying I was short of the correct hoses and debating the topic with Derek. Derek assured me I had the correct combination despite the hoses not marrying with the guide. Of course Derek was correct, my aim is to hopefully reduce your concern should you also receive the same combination.
Before we proceed into the details it's worth commenting you need to cut the hoses supplied to fit the plumbing requirements. If you have the same hoses as those supplied to me and if you follow a logic strategy during installation you should have plenty of lengths to achieve a suitable result. I remember being fearful of having incorrect hoses and the potential to come up short if incorrectly cut. I needn't have worried.
Additionally, and I appreciate it's not actually a hose, when reading the assembly guide you'll find references to a 'submarine'. As an inexperienced builder I spent a reasonable amount of time wondering what this actually referred to and why. You may have already worked it out, but for those that might still be wondering, here it is.

As far as I'm aware the name submarine isn't a technical description or name, it's called a submarine because it looks like a submarine. In terms of function, the submarine is basically an adapter so that a temperature probe/sender can be inserted to the coolant flow. The sender output is used only by the water temperature gauge on the dashboard, it isn't used by the car's ECU so won't control the fan or fueling. If you disconnect the electrical spade connector from the sender when the car is running the gauge will go to maximum. My sender was already attached to the engine's loom, you'll probably find yours there too.

Anyway back to the hoses......
Oh, one last caveat, the layout I'm going to describe includes a heater. Yes a heater in a Caterham, I know that's not the ethos of the car! That said most of the dealer cars I looked at when ordering had heaters, so I figured it was a much needed optional extra.
I'm also not going to discuss the very large and stiff coolant hose which fits between the top radiator port and the engine block. That hoses should be pretty clear, it needs to be fitted prior to the engine install (according to the assembly guide) and you'll need to cut it to length once you have your radiator installed, whichever radiator you have.
I'm going to focus on the variety of softer silicon hoses supplied, all marked with Caterham Motorsport and of equal diameter, approximately 26mm in total diameter (measured to the outside carcass)
Let's quickly cover the section of the circuit where I didn't follow the instructions supplied by Derek. The connection between the heater valve bottom pipe and submarine. Derek stated I should use a straight section of hose which is then arced around to fit the aforementioned parts. I didn't like this as a solution, instead I cut the hose with a 90 degree corner and used the 90 to form the required shape between the heater and submarine.

To me this was a far neater solution, also the 90 degree bend isn't required elsewhere so its spare. Just remember to fit to the lower heater valve port and the near side of the submarine.
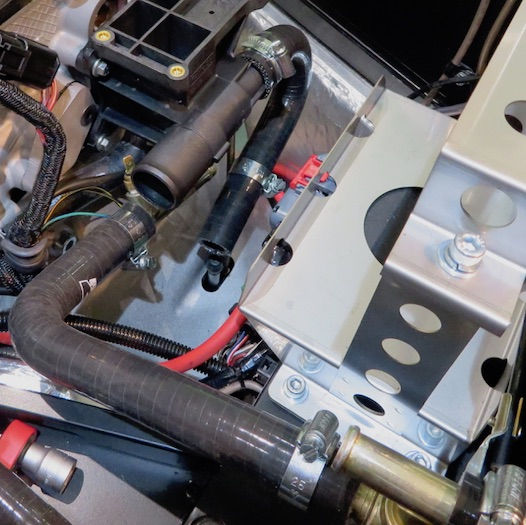
The offside of the submarine has as a 180 degree bend which loops up and back on itself to meet a housing pre-installed on the car, sorry not sure what it's officially called. The 180 degree bend needs to be cut from the only hose which has 180 degree bend in it. There is a similar hose, which bends near 180 degrees, however that hose increases in diameter at the curve. Do not use that hose here.

The following photograph illustrates the 180 and 90 hoses connected with the submarine.

The larger top left port is used for the stiffer hose which runs to the radiator. I must have removed it when doing the installed, despite the manual saying to install before the engine goes in. Conclusion, you don't need to install it prior to the engine install.
I've mentioned the heater valve a couple of times, the valve controls the volume of flow around the heater matrix and hence the level of heat coming out of the heater matrix. The valve is connected to the heater using two small straight sections of hose as shown in the image below. The two sections can be cut from the hose used for the 180 degree bend, they're about 120mm in length.

In the above image the bottom left hose runs to the submarine via the previously discussed 90 degree bend. The top left unconnected port requires a host which runs down the left hand or cold side of the engine into the lefthand side (nearest the cabin) of a T-piece as shown below.

The short hose cut and attached in the aforementioned image then connects to the engine block near the thermostat housing. Unfortunately due to limited access its difficult to photograph this installation. The straight hose used from the heater valve to the T-piece is approximately 600mm in length and can be taken from an existing off cut, I believe that used for the 180 bend to the submarine.
The other side of the T-piece, that which is nearest to the front of the car is connected to the coolant expansion bottle downward facing port.

To connect the expansion tank and T-piece you need to use the hose which has an acute bend and changes in diameter at the curved end. The diameter of the curved end widens to accommodate the expansion tank connection although the fit is less than ideal. The majority of the hose is same diameter as the rest of the hose used so far. This hose also needs to be cut to length so that it neatly connects with the T-piece without excess.
Lastly of course there is a specifically shaped and large diameter hose designed to run between the radiator bottom port and the thermostat housing. This one should be straightforward to sort.
Obviously all hoses are secured with jubilee clips and Caterham supply plenty. It is worth noting in the assembly guide, Caterham make reference to not over tightening the jubilees clips. I heeded the recommendation, although found all leaked slightly once the coolant system reached pressure under normal operation. I had to go around and tighten all of the hoses, if you are cautious like me, I'd expect to have leaks during start. I guess it's better than damage to the connections though.
I hope you've found this helpful, and a slightly different approach to a topic already covered by many other builders.
Thanks for reading


Comments